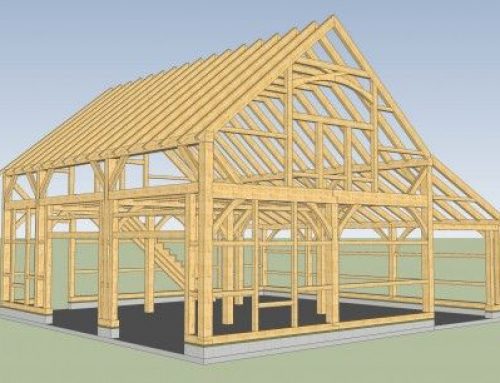
Step stool is a great utility that can be found in almost every house. It is generally used to grasp things that are kept at some height.Why not make your own step stool that gives you the benefit of extra storage that your kids would love to use everyday!
Things you need:
- Wood ( Any type of wood like plywood, pinewood, pallet wood)
- Wooden screws (50.8 mm) or nails
- Pair of brass or steel hinges
- Drill
- Drill bits
- Measuring tape
- Pencil or marker
- Bandsaw/jigsaw/circular table saw
- Clamps
- Carpenter’s glue
- Electric sander or Sanding block
- Clamps
Let’s start doing it!!!
Planning:
You can go for any width and height according to who all will be using this stool and your leftout scrap wood. Here, we are going to make a stool that will have a base of 14” X 7 ½” (355.6 mm X 190.5 mm) and height of 12” (304.8 mm). The width or thickness of the planks should be around ¾” (19.05 mm) in order to provide a strudy base for our stool.
Remember,its always better to plan, measure twice and then cut for more accurate results. For this step stool, we need:

- Two 14’’ X 7 1/2” (355.6 mm X 190.5 mm) planks
- Two 14” X 11 1/4” (355.6 mm X 285.75 mm) side planks [Mark out a reactangle of 7’’ x 6’’ (177.8 mm X 152.4 mm) from top left corner and a near about 3’’ x 2’’ (76.2 mm X 50.8 mm) hole for handle adjustant to it from both the planks. Mark an arc of 4’’ (101.6 mm) approximately with the help of any circular lid or object below the 7’’ x 6’’ (177.8 mm X 152.4 mm) mark. This carves out space for holding from bottom of stool and create the legs of stool. )
- One more 14 x 11 ¼’’ (355.6 mm X 285.75 mm) plank is needed for back of the stool
- One 14’’ x 6’’ (355.6 mm X 152.4 mm) plank (mark an arc from top of it)
- One 14’’ x 5 ¼’’ (355.6 mm X 133.35 mm) plank( mark an arc from the bottom)
- One 14’’ x 14’’ (355.6 mm X 355.6 mm) plank (for the base)
Cutting:

Now,we’ll cut the marked wooden planks according to diamensions.You can use any cutting tool here that you already have like jigsaw, bandsaw, circular saw etc. Cut all the pieces carefully.
Sanding:

After cutting the planks, next step is to sand each and every piece properly with the help of electric sander or sanding block. Do sanding at the edges properly.By doing this,your planks will be splinter free and will look smooth.
Assembling:
- After sanding all the pieces, they are ready to be attached together. Lift up the sides(two 14” X 11 1/4” (355.6 mm X 285.75 mm) planks having handles) and hold them against the back of stool (third 14” X 11 1/4” (355.6 mm X 285.75 mm) planks) , glue and clamp it for some time. With the help of drill with attached drill bits,punch holes and then insert wooden screws or nails.
- Attach the front pieces one by one appling glue to the sides of pieces. Fix 14’’ x 5 ¼’’ (355.6 mm X 133.35 mm) plank below with arc facing bottom , 14’’ X 7 1/2” (355.6 mm X 190.5 mm) plank above it so as to form lower step for the stool and one 14’’ x 6’’ (355.6 mm X 152.4 mm) plank upright with semi circle arc facing the top.Now, drill holes and insert the nails.
- Turn the stool upside down and attach the 14’’ x 14’’ (355.6 mm X 355.6 mm) plank to form the bottom of the stool. Again, use glue and nails for longlasting joints.
- Finally,we have to attach a lid to the stool. Take the remaining 14’’ X 7 1/2” (355.6 mm X 190.5 mm) plank and attach hinges to it and attach the other side of hinges to the back of the stool. Fix these hinges with the help of screws given along with it.

Final Touch Up:
Your stool is ready now. You can coat it with oil , stick stickers of the favourite cartoon character or paint it beautifully for your lovely kids.Your kids really gonna love this one… click snaps of your child using your handmade stool and share it with everyone!

Leave A Comment